Sunday, 3 April 2016

Happy Hunting

Hi everyone, here is one of the projects I have been working on today.  I am entering this into the Crafts and Me Facebook Challenge - Pastel Colours.

Card recipe: 

White hammered cardstock
White super smooth cardstock
Embossing folder from Sheena Douglass
Green packing paper
Tonic fancy rectangle dies, petal pairs flower punch and crystal sparkles
Tattered Lace flourish pearls die
Crafts and Me Happy Hunting digi image coloured with Copics and Prismacolor pencils

Thanks for visiting my blog and I hope you like what I've created.

Peter Pan Fairytale

Hi everyone, here is one of the projects I have been working on today.  I am entering this into the Fabrika Fantasy Visiting A Fairy Tale Challenge.

Card recipe: 

White hammered cardstock
White super smooth cardstock
Dark green co-ordinations cardstock
Embossing folder from Sheena Douglass
Peter Pan image from internet
Fabrika Fantasy Fire Fairy digi image coloured with Copics, Prismacolor pencils and Spectrum Sparkle Glitter pens

I coloured the Fire Fairy so that she resembled Tinkerbell from Peter Pan!

Thanks for visiting my blog and I hope you like what I have created.


Friday, 1 April 2016

Fire Fairy

Hello everyone, here is what I've been working on today.

I am entering this into the Fabrika Fantasy March Challenge - Flowers are Everywhere!
WOW JUST SAW I WAS A WINNER WITH THIS

Card recipe: 

White hammered cardstock from crafty stash
White cardstock and paper from crafty stash
Gold mirror card from crafty stash
Black cardstock from crafty stash
Sheena Douglass Wild Rose dies
Faux pearls
Fabrika Fantasy Fire Fairy digi image coloured with Copics and Prismacolor pencils

To create this card I scored and folded a sheet of A4 white hammered card to make an A5 landscape card blank.

After creating the background (which is thanks to Alyce over at Kit and Clowder background class)   and colouring my image I matt and layered onto some black card and gold mirror card before adding to my main card blank on the left hand side.

I die cut the flowers and leaves onto some white paper and then coloured with the same colour combo as I used for the main image.

Finally, I added some faux pearls in the centre of the flowers.

Thanks for visiting my blog and I hope you like what I've made today.

Sisters of Craft - April 2016 Challenge


Good morning everyone, welcome to another challenge at Sisters of Craft.  This month our sponsor is the gorgeous Moonflower.

Here is my DT make for this month's challenge.

Card recipe: 

White hammered cardstock from crafty stash
Purple cardstock from Create and Craft
Tonic Sparkle Crystal Drops
Spellbinders flower and flourish dies
Moonflower Sakura Maiden digi image coloured with Copics, Derwent pencils and Spectrum Noir Sparkle Glitter pens
Embossing folder from Sheena Douglass

To create this card I scored and folded a sheet of A4 white hammered card to make a 15cm x 15cm square card blank.  To this I added a piece of purple card which I had passed through the embossing folder.

After colouring my image, I cut her out and matt and layered onto some purple and white card before adding to my main card blank.

Finally, I added the die cut flower and flourish embellishments and finished with some of the Crystal Drops.

Thanks for visiting my blog and I hope you like my DT project for this month's challenge.

Thursday, 31 March 2016

Julia Spiri Challenge - 31 March 2016


Good morning everyone welcome to another challenge over at Julia Spiri.  The optional theme for this challenge is Film, Book, Song.

Here is my DT make for this challenge my theme is Moulin Rouge!

Card recipe: 

White hammered cardstock from crafty stash
Red mirror card from crafty stash
Backing picture from crafty stash
Black feathers from crafty stash
Tim Holtz Weathered Wood distress ink
Black patterned peel off
Julia Spiri Chic Girl digi image coloured with Copics, Sakura 3D Glaze pen and Lyra Rembrandt Polycolor pencils
Tattered Lace letter dies
Black fine line pen

To create this card I scored and folded a sheet of A4 white hammered card to make a 7.5in x 5in card blank.  To this I added the backing paper.

I ran a strip of the black peel off down the left hand side of the card.  After colouring my image I fussy cut around her, added some black feathers to the back of the image before attaching to my main card using foam tape and glue gel.

I die cut the letters in red mirror card and added to the right hand side of my card using wet glue.

Thanks for visiting my blog today and I hope you like what I've created.

I am entering this into the following challenges:

The Crafty Addicts
http://craftingfromtheheartchallengeblog.blogspot.co.uk/
http://artbymiranchallenge.blogspot.ca/
http://scrappers-delights-challenge-blog.blogspot.no/
http://our-crafty-corner.blogspot.co.uk/
http://cck-digitalstamps-challenge.blogspot.co.uk/p/current-challenge.html
http://scrappers-delights-challenge-blog.blogspot.co.uk/


Links 
Esty Shop
Challenge Blog
Facebook Fan Group
Julia Spiri on Pinterest
Julia Spiri on Google+

Wednesday, 30 March 2016

Inspiration Destination Challenge 79


Welcome to another challenge over at Inspiration Destination, we would love you to join us and show us your creations.

This week we have two fantastic sponsors, Cute as a Button and Fresh Brewed Designs.

My first DT make this week is using a really fun image from Fresh Brewed Designs.


Card recipe: 

Black cardstock from crafty stash
White cardstock from crafty stash
Embossing folder from Sheena Douglass
Yellow backing paper from DCWV
Sentiment from My Paper Stash
Fresh Brewed Necking Giraffes coloured with Copies and Sakura Clear Glitter pen
Tonic circle dies

To create this card I scored and folded a sheet of A4 black card to make an A5 landscape card.

To this I added a piece of white card which I had put through the embossing folder.

After colouring my image I die cut them and matt and layered onto some of the yellow backing paper before adding to my main card using wet glue.

After cutting out my sentiment using fancy edge scissors, I matt and layered onto some more of the yellow backing paper and then added to the bottom right hand side of my card.

My second DT make for this week is using an image from Cute as a Button.


Card recipe: 

White hammered cardstock from crafty stash
Backing paper, embellishment and sentiment from Debbi Moore Garden Bookazine CD & Magazine
Green textured paper from crafty stash
Cute as a Button Good Soil digi image coloured with Copics and Lyra Rembrandt Polycolor pencils
Tonic fancy rectangle dies

To create this card I scored and folded a sheet of A4 white hammered card to make a 7.5in x 5.5in card blank.  To this I added a piece of backing paper.

After colouring my image I die cut her and matt and layered onto some green textured paper before adding to my main card.

I added a pair of wellington boots and the sentiment at the bottom to complete.

Thanks for visiting my blog today and I hope you like my DT projects for this week's challenge.


Monday, 28 March 2016

Lavender and Rusty Can

Hi everyone, here is what I've been working on today.  This is my colouring of the Lavender and Rusty Can over at Kit & Clowder Elements of Nature Class.

I am very happy with the way this image turned out and intend to make a card using this.

I will add the card to this blog once I have created it!


Sunday, 27 March 2016

Poppy Glamour

Hi everyone, here is a card I have made today.  I am entering this into the CCK Colouring Event over at Kit & Clowder.

Card receipe: 

White hammered cardstock
Backing paper
White super smooth cardstock
Green co-ordinations card
Faux pearls
Tattered Lace flower and leave dies
Ching Chou Kuik Poppy Glamour digi image coloured with Copics, Prismacolor pencils and Spectrum Sparkle Glitter pens

Thanks for visiting my blog and I hope you like what I've created.

Poppies

Hi everyone, here is what I've been working on today.  This is my colouring of the Poppies over at Kit & Clowder Elements of Nature Class.


I am very happy with the way this turned out and I intend to make a card using this image.


Card recipe: 

White hammered cardstock
Green textured cardstock
Sentiment from Hunkydory
Poppies image courtesy of the Elements of Nature Class coloured with Copics

This card will be sent to one of my fellow clowdies in America.

Thanks for visiting my blog and I hope you like what I've created.

Saturday, 26 March 2016

Calla Lily

Hi everyone, here is what I've been working on today.  This is my colouring of the Calla Lily over at Kit & Clowder Elements of Nature Class.


I am very happy with the way this one turned out and intend to make it into a sympathy card.


Card recipe: 

White hammered cardstock
Dark blue backing paper
Sentiment from Hunkydory
Calla Lily image courtesy of the Elements of Nature Class coloured with Copics

Sympathy cards are never easy to make for anyone but this image is so beautifully simple it just works.

Thanks for visiting my blog and I hope you like what I've created.


Friday, 25 March 2016

Doodlebug Bunny Ballerina

Hi everyone, here is my entry for the Faery Ink March 2016 Challenge.

Card recipe: 

White hammered cardstock
Purple mirror card
White super smooth paper
Blue co-ordinations card
Cool Peri Alcohol Ink
Faery Ink freebie digi image coloured with Copics, Prismacolor pencils and Fiskars gel pens
Flower embellishments
Sentiment from Hunkydory

Thanks for visiting my blog and I hope you like what I've created.

Orchids

Good morning everyone, here is a card I have made today using one of the new collections from Julia Spiri. This image is called The Spring Orchid and you can find her in the shop (link below).

Card recipe: 

White hammered cardstock
White super smooth paper
Patterned backing paper
Sentiment from Hunkydory
Orchid watercolour flowers from Julia Spiri
Glitter sparkle drops from Tonic
The Spring Orchid digi image coloured with Copics and Prismacolor pencils

Thanks for visiting my blog and I hope you like what I've created.

Why not pop along to the challenge blog (you can find the link below) and join in and have some fun with us.  You will find loads of inspiration from the DT members on there.


Links 
Esty Shop
Challenge Blog
Facebook Fan Group
Julia Spiri on Pinterest
Julia Spiri on Google+

Wednesday, 23 March 2016

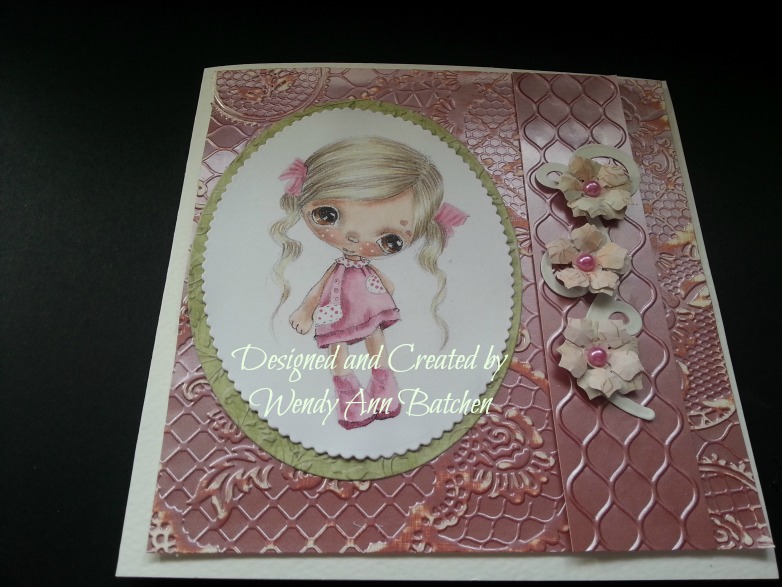
Mily

Hi everyone, here is the beautiful freebie Mily from Ppinkydolls Art.

Card recipe: 

White hammered cardstock
Patterned papers
Pink satin board from Create and Craft
Tattered Lace embossing folders
Tonic fancy oval dies and flower punch
Faux pearls
Ppinkydolls Art freebie digi image coloured with Copics and Prismacolor pencils

Thanks for visiting my blog and I hope you like what I've created.

Duckling Discovery

Hi everyone, here is what I've created using the lovely Hannah Lynn image.  I am entering her into the Crafts and Me Freebie Challenge.  Here is the link Crafts and Me Freebie Challenge

Card recipe: 

White hammered cardstock
Green co-ordinations card
Blue co-ordinations card
Purple co-ordinations card
Waves embossing folder from Sheena Douglass
Faux pearls
Sentiment from Hunkydory
Hannah Lynn Duckling Discovery digi image coloured with Copics, Prismacolor pencils and Spectrum Sparkle Glitter pens

Thanks for visiting my blog and I hope you like what I've created.

Inspiration Destination Challenge 78


Welcome to another challenge over at Inspiration Destination, we would love you to join us and you can find the link here Inspiration Destination

This week we have two fantastic sponsors, Sassy Studio Designs and Bugaboo.

My first DT make this week is using an image from Bugaboo


Card recipe: 

White cardstock from crafty stash
Blue backing card from crafty stash
Bugaboo Daisy Butterfly Tag digi image coloured with Spectrum Noir Sparkle Glitter pens
Sentiment from Hunkydory
Blue brad from crafty stash

To create this card I scored and folded a sheet of A4 white card to make a 7in x 5in card blank. 

After colouring my image I fussy cut around and added it to the front of my card at a jaunty angle before adding the brad and then adhering to the front of my card.

Finally, I added the sentiment to complete.

My next DT make for this week is using an image from Sassy Studio Designs.  I am also using this card for my cousin's birthday in April.


Card recipe: 

White cardstock from crafty stash
Blue cardstock from crafty stash
Sentiment from Hunkydory
Tonic square and fancy oval dies
Sassy Studio Designs Aries Portrait digi image coloured with Copics and Prismacolor pencils

To create this card I scored and folded a sheet of A4 white card to make a 15cm x 15cm square card blank.  To this I added a piece of blue card, then a piece of white card and another piece of blue card.

After colouring my image I die cut her and added her to the centre of my card.

Finally, I added the sentiment to the bottom right hand side to complete.

Thanks for visiting my blog today and I hope you like my DT makes for this week's challenge.

Monday, 21 March 2016

Julie

Hi everyone, here is a card I have made for a customer order.

Card recipe: 

White hammered cardstock
Purple cardstock
Purple satin board
Pink organza ribbon
Sentiment and butterfly embellishment from Hunkydory
Tiddly Inks Annabel and Puppy Love digi image coloured with Copics and Prismacolor pencils
Tattered Lace letter dies
Alcohol inks in various colours

To create this card I scored and folded a sheet of A4 white hammered card to make an A5 portrait card blank.

After colouring my image I matt and layered onto some purple satin board, then onto some purple cardstock before adding to my card using a strong double sided tape.

I wrapped the ribbon around a piece of satin board, then matt and layered onto some of the purple card before adding to the bottom part of my card.

I die cut the letters in white hammered card and attached on top of the ribbon, then added to the bottom of my card.

Finally, I added the sentiment at the top left hand side and the butterfly embellishment at the bottom right hand side.

Thanks for visiting my blog and I hope you like what I've created.

Thursday, 17 March 2016

Julia Spiri Challenge Blog - 17th March 2016


Good morning everyone, welcome to another challenge, the theme for this one is Paris and here are my DT makes.  I love these images so much I just had to make more than one!!

Card Recipe:

White cardstock from crafty stash
Green cardstock from crafty stash
Backing papers from Debbi Moore Paris Bookazine CD
Julia Spiri The Flower Girl  digi image coloured with Copics, Derwent pencils and Spectrum Noir Sparkle Glitter pen
Tattered Lace leaf die
Sentiment from crafty stash
Faux gems
Tonic rectangle dies

To create this I scored and folded a piece of A4 white card to make a 15cm by 15cm square card blank.  To this I layered some backing papers.

After colouring my image I die cut her and attached to my card using wet glue.

I fussy cut the flowers from one of the backing papers, shaped them with a ball tool and added to the bottom left hand side of my card, adding the leaves and the faux gems.

Finally, I added three faux gems to the top right hand side of my card and the sentiment just below these.

It was my son and daughter-in-law's 16th wedding anniversary on 26 February and I made this card for them.

Card recipe: 

White scalloped card blank from crafty stash
Blue satin board from Create and Craft
White card from crafty stash
Cloud embossing folder from Sheena Douglass
One of the new fabulous Love in Paris digi image by Julia Spiri coloured with Copics, Spectrum Noir Sparkle glitter pens and Prismacolor pencils
Crafters Companion sentiment dies.
Corner punch

To create this card I used a  white 8in x 8in scalloped card blank.

To this I added a piece of smaller blue satin board which I had passed through the embossing folder and rounded the edges using the corner punch.

After colouring my image I cut around and used a corner punch on the edges before adding to my main card.  I added the Love in Paris sentiment which comes also from Julia Spiri and finally the die cut words to complete.

Thank you for visiting my blog today and I hope you like my DT makes for today's challenge.

Challenges entered:

The Crafty Addicts
http://craftingfromtheheartchallengeblog.blogspot.co.uk/
http://artbymiranchallenge.blogspot.ca/
http://scrappers-delights-challenge-blog.blogspot.no/
http://our-crafty-corner.blogspot.co.uk/
http://craftyourpassionchallenges.blogspot.co.uk/


Links 
Esty Shop
Challenge Blog
Facebook Fan Group
Julia Spiri on Pinterest
Julia Spiri on Google+

Wednesday, 16 March 2016

Dragon Orb

Hi everyone, I have finally finished the Kit and Clowder February Colouring Class using the beautiful Dragon Orb by Molly Harrison.


Had to improvise with the colours for the background as I don't have refill inks for Copics.  I did find several alcohol inks I had and used these but am a bit limited on the colours.  However, I think the end result was not too bad.

Hope you like what I've done with this image and would love to hear your feedback.

Inspiration Destination Challenge 77


Welcome to another challenge over at Inspiration Destination, we would love you to join us and show us your creations.

This week we have two fantastic sponsors, Polkadoodles and Pattie's Creations.

My first DT make for this week's challenge is using an image from Polkadoodles.


Card recipe: 


White cardstock from crafty stash
Backing paper and sentiment from Polkadoodles Sticks and Bones CD
Polkadoodles Sticks and Bones Mammoth digi image coloured with Copics, Derwent pencils and Sakura Glitter pen
Tim Holtz Antique Linen Distress Ink
Tonic square and rectangle dies

To create this card I scored and folded a sheet of A4 white card to make an A5 landscape card blank.  To this I added the backing paper printed from the CD.

After colouring my image I die cut and distressed with the Antique Linen ink, I also distressed the edges a little before adding to my card using wet glue.

After die cutting my sentiment I also went around with the distress ink before adding to my card.

My second DT make for this week's challenge is using an image from Patties Creations.


Card recipe: 

White cardstock from crafty stash
Blue backing card from DCWV
Sentiment from Hunkydory
Tonic fancy rectangle dies
Pattie's Creations Artist Pattieboop coloured with Copics and Lyra Rembrantd Polycolor pencils

To create this card I scored and folded a sheet of A4 white card to make a 7in x 5.5in card blank.

To this I added a piece of the blue backing card.

After colouring my image I die cut her and matt and layered onto some matching blue card and white card before adding to my main card blank.

Finally, I added the sentiment using foam tape.

Thank you for visiting my blog today and I hope you like my DT makes for this week's challenge.

Tuesday, 15 March 2016

Aurora Vine

Hi everyone, here is my entry for the Kit & Clowder Colouring Event - The East Wind.  Here is the link Colouring Event - The East Wind.

Card recipe: 

White hammered cardstock from crafty stash
White cardstock from crafty stash
Green cardstock from crafty stash
Flower embellishment from crafty stash
Satin ribbon from crafty stash
Butterfly embellishment from Hunkydory
Flower embellishment from crafty stash
Faux pearls
The East Wind Aurora Vine digi image coloured with Copics and Prismacolor pencils
Embossing folder from Sheena Douglass
Rounded corner punch

To create this card I scored and folded a sheet of A4 white hammered card to make a 15cm x 15cm square card blank.

I ran a piece of the green card through the embossing folder, sanded back to reveal the white core and added to the front of my card.

After creating the background (courtesy of one of Alyce Keegan's colouring class) and colouring my image I die cut her and added to the left hand side of my card.

Finally, I added the flower embellishment and ribbon bow at the top right hand side, the butterfly embellishment on the bottom left hand side and the faux pearls on the bottom right hand side.

Thanks for visiting my blog and I hope you like what I've created.